The SOLIDWORKS Drawing Template is a tool to help users standardize CAD drawings. A drawing template on its own is basically a set of standards used for drawing and dimensioning parts.
Often times designing a new drawing from scratch is hectic and time-consuming. It is way better to have all your drawings standardized so that you can save time and effort.
Now you may ask, how do I create a template and edit it according to my own needs? In this step-by-step guide, we will be covering these few topics to help you get started with a SOLIDWORKS Drawing Template.
1.Drawing Sheets and Sheet Formats
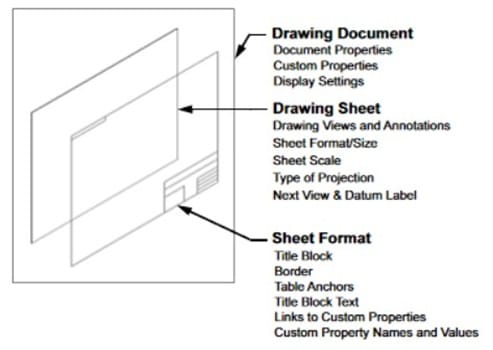
Before we jump in, here is a bit of information about how SOLIDWORKS drawings work. It consists of two distinct layers which are the Drawing Sheet and the Sheet Format.
The Drawing Sheet is where the views of your parts and assembly show up, alongside any dimensions, annotations, and markups.
Sheet Format (*.slddrt) on the other hand contains the border, title block, sheet size, and other relevant information that can be customized and edited to match your company standards respectively.
Here is an illustration of the two separate layers to better visualize and understand how these file formats work.
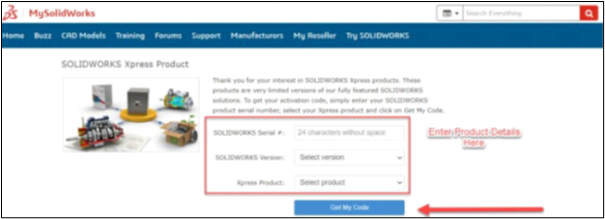
3. Click on the ‘Select My SOLIDWORKS.com/xpress’ link.
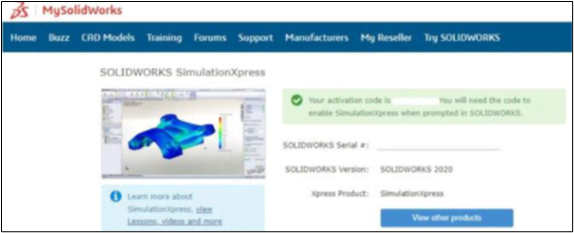
4. After logging into MySOLIDWORKS.com/Xpress, enter the SOLIDWORKS serial number, version, and the Xpress product required for activation. Click “Get My Code”.
Transform Your Business With Us Through Cutting-Edge 3D Software
Experience the power of advanced technology and gain a competitive edge in the market. Request a demo today or contact us to get started on your journey towards success!